ハニーポットを自宅に設置しVPS経由で公開する
下記を読んで自分もハニーポットを植えてみたいと思いました。
どうせなら色々なハニーポット試したいし、攻撃の様子もいい感じに可視化したい。
だったらT-Potを植えればいいじゃない!ということで環境を構築してみました。
環境構成
環境構築のしやすさと運用コストの観点から下記の構成を取りました。
VPSを経由して自宅のサーバを公開する方法です。

補足
・クラウドに設置するのが一番楽だが、T-Potの動作条件を満たそうと思ったらレンタル料が高額になってしまう。(RAMがネック)
・VPSを使わない場合、インターネット側から自宅サーバへの通信を通すのが難しい。
(参考)T-Potの動作条件(Standard Installation)
・6-8GB RAM
・128GB SSD
– system-requirements
注意事項
・事前にVPSの利用規約をお確かめください。
・運用には細心の注意を払ってください。
・当サイトに掲載された内容によって生じた損害等の一切の責任を負いかねますので、ご了承ください。
T-Potのインストール
インストール方法はいくつか公開されており、ネットで検索した感じPrebuilt ISO Imageを使う方が多いようです。
が、自分の環境ではPrebuilt ISO Imageだとインストールが上手くいかなかった(パーティションを認識してくれずエラー終了する)ので、Post-Install Userでインストールしました。
サーバとして用意した実機はLiva-Zです。
8Gメモリ x 2枚、120GB SSDを追加しました。
Debianのインストール
T-PotのREADMEにはDebian 9.7 (Stretch)が要件に書いてありますが、私はDebian 10.3を使いました。(よく確認せず最新をダウンロードしてしまった)
余計なエラー等にハマりたくない方は、なるべく要件に合わせたほうがよいでしょう。
概要
(1)Debianのインストール用ISOイメージをダウンロードしてメディアに焼く。
(2)インストール用メディアを用意したサーバに接続してメディアからブート。
(3)インストールガイドに従ってインストール実施。
今回、インストール時のパーティション構成は”/”にディスクの全容量を割り当てました。

T-Potのハニーポットはdockerコンテナで構成されており、デフォルトでは実データが/var/lib/docker配下に格納されます。
何も考えず/varにパーティションをきると/varがすぐにディスク100%になってしまうので注意です。
Debianのインストールはこちらから。
Downloading Debian CD/DVD images via HTTP/FTP
T-Potのダウンロード&インストール
下記記載の手順にしたがって実行します。
gitが必要なので事前にインストールしましょう。
https://github.com/dtag-dev-sec/tpotce#post-install-user
# apt install git
# git clone https://github.com/dtag-dev-sec/tpotce
# cd tpotce/iso/installer/
# ./install.sh --type=user
エディションはStandardを選択しました。

WEBの管理画面(Kibana)にログインするためのユーザ名+パスワードを設定します。

実行したシェルスクリプトが終了し再起動すればT-Potの完成です。

VPS-IX2105間のIPsec-VPN
SoftEther(vpnserver)のインストールと設定
下記を参考にしてVPSにvpnserverをインストールします。
https://ja.softether.org/4-docs/1-manual/7/7.3
vpnserverを起動できたらVPNサーバの管理ツールを使って設定を行います。
https://ja.softether.org/4-docs/1-manual/2/2.4
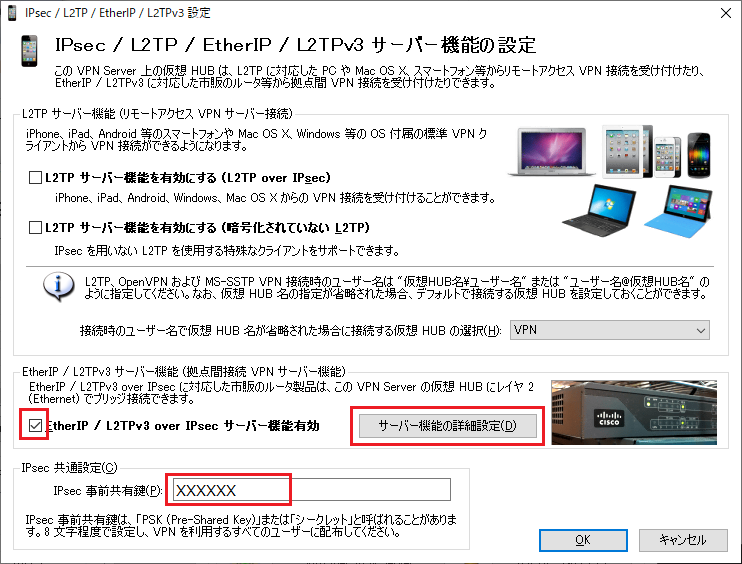
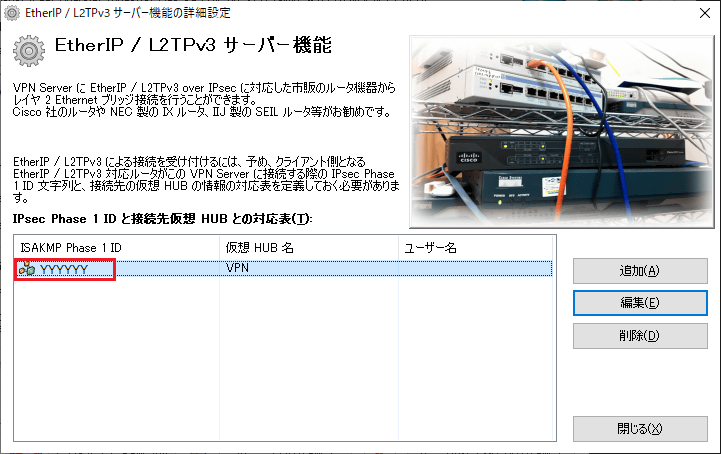
EtherIP/IPsecの設定
EtherIP/L2TPv3 over IPsecサーバ機能を有効にして、IPsec事前共有鍵を入力し、サーバ機能の詳細設定からISAKMP Phase 1 IDを設定します。
IX2105のコンフィグレーション時に同じ値を使います。
(XXXXXX, YYYYYYはお使いの環境に置き換えてください)
VPSにLAN2用のインタフェースが必要となるのでローカルブリッジの設定からtapを作成します。
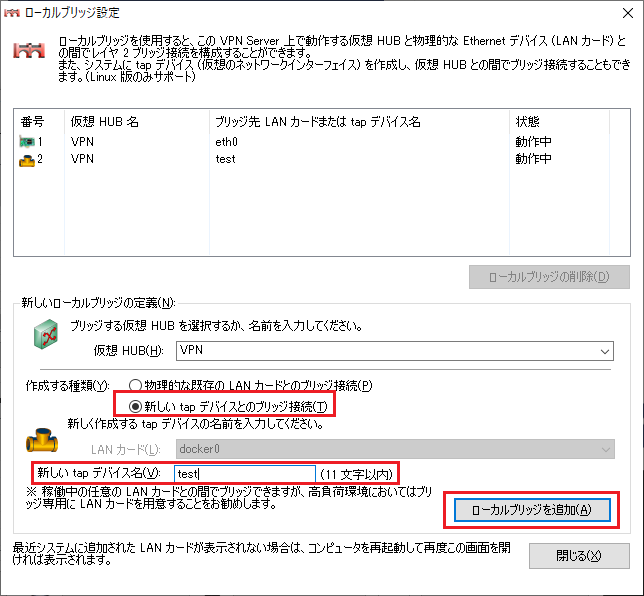
tapが作成できたらIPアドレスを付与します。
# ip link show dev tap_test
24: tap_test: <BROADCAST,MULTICAST,UP,LOWER_UP> mtu 1500 qdisc pfifo_fast state UNKNOWN mode DEFAULT group default qlen 1000
    link/ether 5e:5d:d2:fe:15:b8 brd ff:ff:ff:ff:ff:ff
# ip addr add 192.168.1.1/24 dev test_tap
IX2105のコンフィグレーション
下記を参考にして同様に設定していきます。
NEC ルータ等からの EtherIP を用いた VPN 接続方法 – SoftEther VPN プロジェクト
コンフィグレーション例
IX2105(config)# show running-config
...
!
!
ip access-list vps permit ip src 203.0.113.1/32 dest 192.168.0.0/24
ip access-list vps permit ip src 192.168.0.0/24 dest 203.0.113.1/32
!
!
!
ike proposal ike-prop encryption aes hash sha group 1024-bit lifetime 3600
!
ike policy ike-policy peer 203.0.113.1 key XXXXXX mode aggressive ike-prop
ike keepalive ike-policy 10 2
ike local-id ike-policy keyid YYYYYY
ike nat-traversal policy ike-policy keepalive 10
!
ipsec autokey-proposal ipsec-prop esp-aes esp-sha lifetime time 3600
!
ipsec autokey-map ipsec-map vps peer 203.0.113.1 ipsec-prop
!
!
!
bridge irb enable
!
!
!
!
!
!
watch-group keepalive 10
  event 10 ip unreach-host 192.168.1.3 BVI1 source BVI1
!
network-monitor keepalive enable
!
!
ip dhcp profile tpot
  assignable-range 192.168.1.2 192.168.1.3
  subnet-mask 255.255.255.0
  default-gateway 192.168.1.1
!
device GigaEthernet0
!
device GigaEthernet1
!
interface GigaEthernet0.0
  ip address dhcp receive-default
  no shutdown
!
interface GigaEthernet1.0
  no ip address
  bridge-group 1
  no shutdown
!
interface BVI1
  ip address 192.168.1.2/24
  ip proxy-arp
  ip dhcp binding tpot
  bridge-group 1
  no shutdown
!
...
interface Tunnel0.0
  tunnel mode ether-ip ipsec
  no ip address
  ipsec policy tunnel ipsec-map out
  bridge-group 1
  bridge ip tcp adjust-mss 1200
  no shutdown
疎通確認
正常にVPNが張れているかshowコマンドやping等で確認しましょう。
IX2105(config)# show ike sa
ISAKMP SA - 1 configured, 1 created
Local address is 192.168.0.2, port is 4500
Remote address is 203.0.113.1, port is 4500
IKE policy name is ike-policy
Direction is initiator
Initiator's cookie is 0x****************
Responder's cookie is 0x****************
Exchange type is aggressive mode
NAT-Traversal RFC3947
NAT detected at local side
State is established
Authentication method is pre-shared
Encryption algorithm is aes-128
Hash algorithm is sha1
DH group is modp1024, lifetime is 550 seconds
#ph1 success: 1, #ph1 failure: 0
#ph1 hash err: 0, #ph1 timeout: 0, #ph1 resend: 0
#ph2 success: 1, #ph2 failure: 0
#ph2 hash err: 0, #ph2 timeout: 0, #ph2 resend: 0


IX2105-HOME(config)# show ipsec sa
IPsec SA - 1 configured, 2 created
Interface is Tunnel0.0
Key policy map name is ipsec-map
UDP encapsulation Tunnel mode, 4-over-4, autokey-map
Local address is 192.168.0.2, port is 4500
Remote address is 203.0.113.1, port is 4500
Outgoing interface is GigaEthernet0.0
Interface MTU is 1422, path MTU is 1500
Inbound:
ESP, SPI is 0x********(********)
Transform is ESP-AES-128-HMAC-SHA-96
Remaining lifetime is 1445 seconds
Replay detection support is on
Outbound:
ESP, SPI is 0x********(********)
Transform is ESP-AES-128-HMAC-SHA-96
Remaining lifetime is 1445 seconds
Replay detection support is on
Perfect forward secrecy is off
VPSからT-POTへの転送
VPSのポートフォワーディング設定
ひとまず、SSHのハニーポットであるCowrieだけ試したいので、T-Potへの転送は22番ポートだけ設定しています。
また、T-Potの管理用ポート(64294, 64295, 64297)へのアクセスはVPS経由 + VPS側で自宅のIPアドレスのみ受け付けるようにフィルタするようにしました。
$ sudo firewall-cmd --list-all
public (active)
target: default
icmp-block-inversion: no
interfaces: eth0
sources:
services: ssh
ports:
protocols:
masquerade: yes
forward-ports: port=22:proto=tcp:toport=22:toaddr=192.168.1.3
sourceports:
icmp-blocks: echo-request
rich rules:
rule family="ipv4" source address="198.51.100.1" forward-port port="64294" protocol="tcp" to-port="64294" to-addr="192.168.1.3"
rule family="ipv4" source address="198.51.100.1" forward-port port="64297" protocol="tcp" to-port="64297" to-addr="192.168.1.3"
rule family="ipv4" source address="198.51.100.1" forward-port port="64295" protocol="tcp" to-port="64295" to-addr="192.168.1.3"
rule family="ipv4" source address="198.51.100.1" port port="500" protocol="udp" accept
rule family="ipv4" source address="198.51.100.1" port port="4500" protocol="udp" accept
この時、T-POTサーバのデフォルトゲートウェイはVPS側(192.168.1.1)にすることを忘れずに。
注意点
VPSの環境によってはローカルIPが既に使用している場合があります。
当方はさくらVPSを使用してますが、192.168.1.0/24は使用済みのようでした。(ping 192.168.1.1とかping 192.168.1.2を打つと応答が返ってくる)
VPS-自宅間のIPアドレスには他と被らないネットワークのアドレスにしましょう。
でないとポート転送が上手くいきません。
また、さくらVPSを使う場合はパケットフィルタの設定に注意が必要です。
パケットフィルタが有効になっている場合、ポート番号1~32767は通信の許可が必要となります(22のsshだけは最初から許可済み)。
さくらのVPSの管理画面からパケットフィルタの設定を行いましょう。

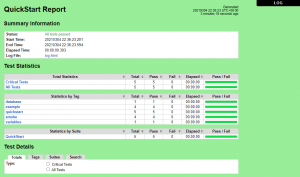
T-POTの動作確認
構築が終わったら、T-Potにアクセスできるか動作確認してみましょう。
下記は5日間程度動かしてみたときの様子です。


コメント