Nginx+uWSGI+viewvcでSubversionのリポジトリをブラウザから閲覧する
ViewVC: Repository Browsingを使ってLinux(CentOS7)上に構築したリポジトリをブラウザから参照可能にしてみます。
これで、Linuxが使えないポンコツな上司から修正内容を問われても、URLをコピペしてメールするだけで済むようになります(?)
Git環境向けはまた今度。
事前準備
必要なパッケージを先にインストールしておきます。
$ sudo yum -y install python python-devel svn subversion-python policycoreutils-devel
$ sudo yum -y groupinstall "Development Tools"
参照するリポジトリ
今回のテスト用に/opt/svn/reposを作ります。
$ sudo mkdir -p /opt/svn/
$ cd /opt/svn/
$ sudo svnadmin create repos
$ sudo chown -R user:user repos/
コミットログも見れるか確認するため作成したリポジトリに適当なファイルを追加します。
$ cd ~/
$ svn co file:///opt/svn/repos
$ cd repos
$ mkdir -p branches  tag  trunk
$ echo "Hello World" > trunk/README
$ svn add *
$ svn commit -m "Create New Repository."
Nginxのインストール
Nginxをyumでインストールするため、リポジトリにnginxのパッケージ取得先を追記します。
$ sudo vi /etc/yum.repos.d/nginx.repo
$ cat /etc/yum.repos.d/nginx.repo
[nginx]
name=nginx repo
baseurl=http://nginx.org/packages/mainline/centos/7/$basearch/
gpgcheck=0
enabled=0
以下のコマンドでインストールできればOK
$ sudo yum -y --enablerepo=nginx install nginx続いて、nginxのコンフィグです。
/viewvcでアクセスした場合にuWSGIに処理させるようにします。
/viewvc-staticはviewvcのロゴ等の画像ファイルを参照するための記述です。
$ sudo vi /etc/nginx/conf.d/default.conf
$ diff -u /etc/nginx/conf.d/default.conf.orig /etc/nginx/conf.d/default.conf
--- /etc/nginx/conf.d/default.conf.orig 2018-09-23 19:20:22.455255538 +0900
+++ /etc/nginx/conf.d/default.conf      2018-09-23 20:58:28.830092221 +0900
@@ -41,5 +41,14 @@
#location ~ /\.ht {
#    deny  all;
#}
+
+    location /viewvc {
+        include uwsgi_params;
+        uwsgi_pass 127.0.0.1:3031;
+    }
+
+    location /viewvc-static {
+        alias /usr/local/viewvc/templates/docroot;
+    }
}
このままではファイアウォールとSELinuxに接続が弾かれるので予めポートの開放とSELinuxを無効化しておきます。
ファイアウォールの設定
$ sudo firewall-cmd --permanent --add-port=3031/tcp --zone=public
$ sudo firewall-cmd --permanent --zone public --add-service http
$ sudo firewall-cmd --reload
SELinuxの無効化
sudo semanage permissive -a httpd_t設定が終ったらnginxを起動します。
$ sudo systemctl enable nginx
$ sudo systemctl start nginx
uWSGIのインストール
公式の方法はこちら。
今回、uWSGIはpipでインストールするので、まずはpipを使えるようにします。
$ curl https://bootstrap.pypa.io/get-pip.py -o get-pip.py
$ sudo python get-pip.py
pipが準備できたらuwsgiを追加します。
$ sudo pip install uwsgi追加できたら、systemctlで起動できるように下記ファイルを作ります。
/etc/uwsgi/uwsgi.ini
$ sudo mkdir -p /etc/uwsgi
$ sudo vi /etc/uwsgi/uwsgi.ini
$ cat /etc/uwsgi/uwsgi.ini
[uwsgi]
socket = 127.0.0.1:3031
wsgi-file = /usr/local/viewvc/bin/wsgi/viewvc.wsgi
uid = nginx
gid = nginx
log = /var/log/uwsgi
master = true
$ sudo vim /etc/systemd/system/uwsgi.service
$ cat /etc/systemd/system/uwsgi.service
[Unit]
Description=uWSGI
After=syslog.target
[Service]
ExecStart=/usr/bin/uwsgi --ini /etc/uwsgi/uwsgi.ini
Restart=always
KillSignal=SIGQUIT
Type=notify
StandardError=syslog
NotifyAccess=all
[Install]
WantedBy=multi-user.target
設定が終ったら起動します。
$ sudo systemctl enable uwsgi
$ sudo systemctl start uwsgi
Viewvcのインストール
こちらから最新版を取ってきます。
$ curl http://www.viewvc.org/downloads/viewvc-1.1.26.tar.gz -o viewvc-1.1.26.tar.gz
$ tar xvf viewvc-1.1.26.tar.gz
$ cd xvf viewvc-1.1.26
$ sudo ./viewvc-install
<インストール先について質問されるが全て<Enter>を押下>
ViewVCのパスとコンフィグをNginx、uWSGIに記載した内容に合わせます。
所有者もnginxに変更します。
$ cd /usr/local
$ sudo chown -R nginx:nginx viewvc-1.1.26/
$ sudo ln -s viewvc-1.1.26 viewvc
$ sudo chown nginx:nginx viewvc
$ cd /usr/local/viewvc
$ sudo vi viewvc.conf
$ diff -u viewvc.conf.orig viewvc.conf
--- viewvc.conf.orig 2018-09-23 19:28:57.955853140 +0900
+++ viewvc.conf 2018-09-23 20:18:35.987344907 +0900
@@ -109,7 +109,7 @@
## svn_roots = svnrepos: /opt/svn/,
## anotherrepos: /usr/local/svn/repos2
##
-#svn_roots =
+svn_roots = viewvc:/opt/svn/repos
## root_parents: Specifies a list of directories under which any
## number of repositories may reside. You can specify multiple root
@@ -658,7 +658,7 @@
## still be based on the global default template set per 'template_dir'
## above, not on 'template_dir' as overridden for a given root.
##
-#docroot =
+docroot = /viewvc-static
## show_subdir_lastmod: Show last changelog message for CVS subdirectories
##結果
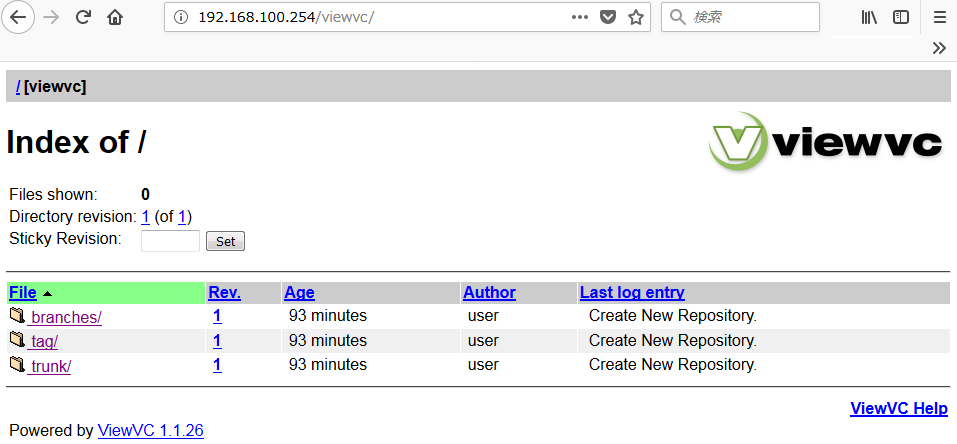
ブラウザにURLを入力してリポジトリの内容が参照できたら成功です。
今回の例では、”http://(サーバーのIPアドレス)/viewvc “にアクセスします。

参考
https://pip.pypa.io/en/stable/


コメント