Windows-Linux間をTCPで通信する
TCPを使ってWindowsとLinux間で通信してみる。
具体的にはWindows上にVirtualboxで仮想マシンを作成しHost-Only-Adapter経由で通信する。
目次
構成
- サーバ : Linux CentOS 6, X86_64(64bit) on Virtualbox
- クライアント : Windows7 (32bit)
プログラム作成
クライアント側
実行バイナリはVisual Studio 2017 で作成。
TCP_Client.cpp
#include "stdafx.h"

#include <stdio.h>
#include <winsock2.h>

#define PORT_NO_SERVER (12345)
#define IP_ADDRESS_SERVER "192.168.100.254"

int main(void)
{
    WSADATA wsaData;
    struct sockaddr_in server;
    SOCKET sfd = -1;
    char buf[32] = { 0 };
    int rc = 0;

    WSAStartup(MAKEWORD(2, 0), &wsaData);

    sfd = socket(AF_INET, SOCK_STREAM, 0);

    server.sin_family = AF_INET;
    server.sin_port = htons(PORT_NO_SERVER);
    server.sin_addr.S_un.S_addr = inet_addr(IP_ADDRESS_SERVER);

    rc = connect(sfd, (struct sockaddr *)&server, sizeof(server));
    if (rc < 0) {
        printf("connect() failed(%d)\n", rc);
        exit(EXIT_FAILURE);
    }

    while (1) {
        memset(buf, 0, sizeof(buf));
        int rs = recv(sfd, buf, sizeof(buf), 0);

        printf("recv %d byte, %s\n", rs, buf);
    }

    WSACleanup();

    return 0;
}
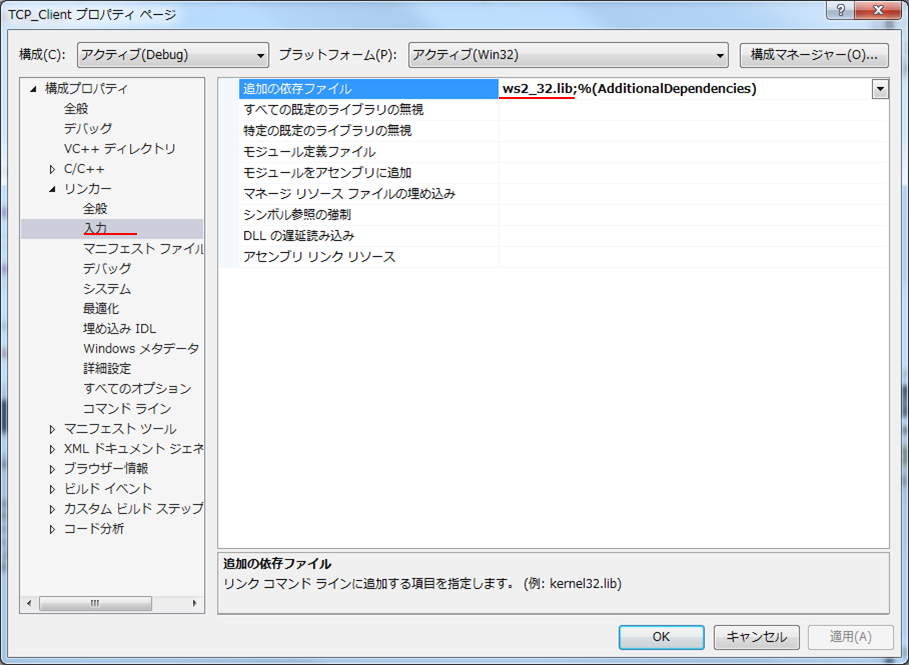
プロジェクトプロパティから入力にws2_32.libを追記してビルドする。
Windows側のIPアドレスを 192.168.100.0/24のネットワークに設定しておく。
C:> ipconfig

Windows IP 構成

イーサネット アダプター VirtualBox Host-Only Network:

   接続固有の DNS サフィックス . . . :
   IPv4 アドレス . . . . . . . . . . : 192.168.100.1
   サブネット マスク . . . . . . . . : 255.255.255.0
   デフォルト ゲートウェイ . . . . . :
サーバ側
tcp_server.c
#include <stdio.h>
#include <stdlib.h>
#include <string.h>
#include <unistd.h>
#include <sys/types.h>
#include <sys/socket.h>
#include <netinet/in.h>
#include <errno.h>

#define MAX_CLIENTS (1)
#define MSGBUF_SIZE (1024)

int main(void)
{
    int sfd = -1;
    struct sockaddr_in client;
    int socklen = sizeof(client);
    int ac_sfd = -1;
    int rc = 0;

    struct sockaddr_in addr = {
        .sin_family = AF_INET,
        .sin_port = htons(12345),
        .sin_addr = {
            .s_addr = INADDR_ANY,
        },
    };

    /* ソケットの作成 */
    sfd = socket(AF_INET, SOCK_STREAM, 0);
    if (sfd < 0) {
        perror("socket");
        goto error_end;
    }

    rc = bind(sfd, (struct sockaddr *)&addr, sizeof(addr));
    if (rc < 0) {
        perror("bind");
        goto close_sfd_end;
    }

    rc = listen(sfd, MAX_CLIENTS);
    if (rc < 0) {
        perror("listen");
        goto close_sfd_end;
    }

    /* 要求受付 */
    ac_sfd = accept(sfd, (struct sockaddr *)&client, &socklen);
    if (ac_sfd < 0) {
        perror("accept");
        goto close_sfd_end;
    }

    while (1) {
        /* メッセージ送信 */
        char msgbuf[MSGBUF_SIZE] = "HELLO WORLD!";
        ssize_t ws = write(ac_sfd, msgbuf, strlen(msgbuf));
        if (ws < 0) {
            perror("write");
            goto close_all_end;
        }

        sleep(1);
    }

 close_all_end:
    close(ac_sfd);
 close_sfd_end:
    close(sfd);
 error_end:

    return 0;
}
ソースコードのビルド
$ gcc tcp_server.c -o tcp_server
$
こちらも通信インタフェースに同様のネットワークのIPアドレスを設定しておく。
$ ip -a addr
3: enp0s8: <BROADCAST,MULTICAST,UP,LOWER_UP> mtu 1500 qdisc pfifo_fast state UP qlen 1000
    link/ether 08:00:27:8c:e9:83 brd ff:ff:ff:ff:ff:ff
    inet 192.168.100.254/24 brd 192.168.100.255 scope global enp0s8
       valid_lft forever preferred_lft forever
実行結果
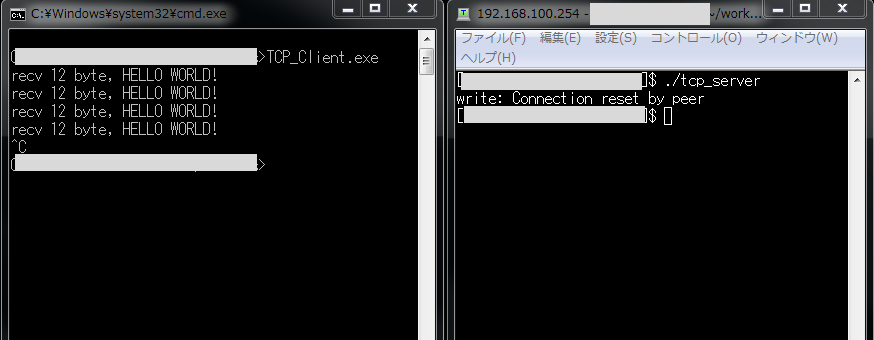
確かにサーバが送信した文字列をクライアントで受け取れている。
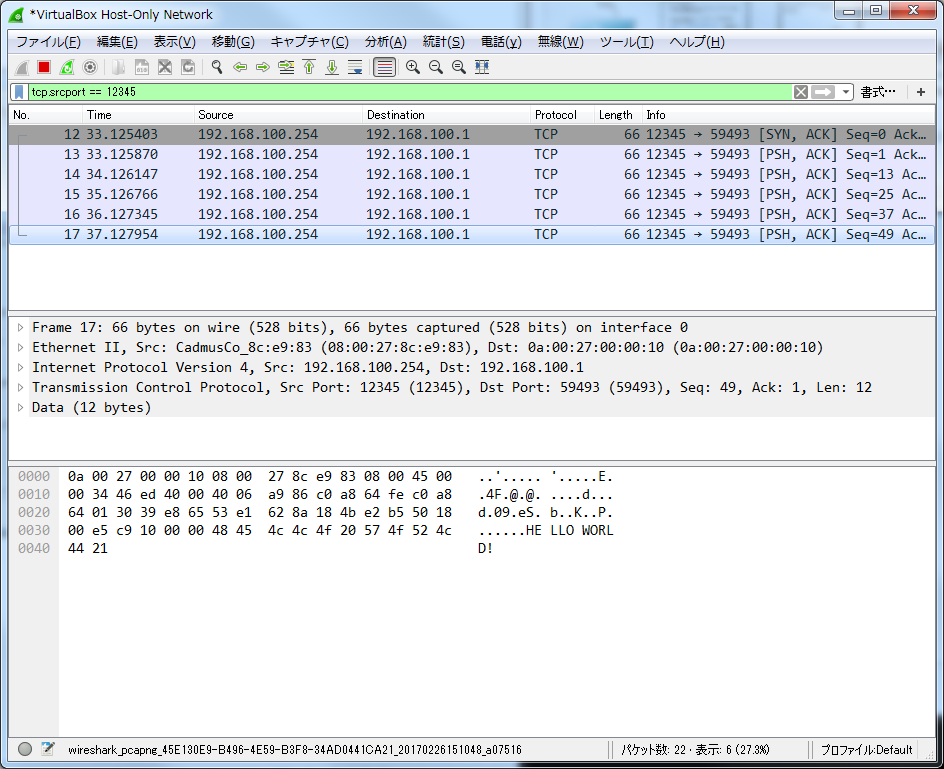
キャプチャを見ても確かに3WAYハンドシェイクからデータ送信まで行っている。
(ただし、クライアント→サーバのキャプチャは見えてない。理由不明。)


コメント